Neat Select: How to Set Up and Use Neat Bar with Bring Your Own Device (BYOD)
Last updated on April 28, 2025
The value of BYOD mode
While Neat devices are optimized for Zoom and Microsoft Teams applications, BYOD Mode allows you to connect Neat Bar to any video conferencing platform using your own computer. This enables you to benefit from Neat Bar’s high-quality audio and video hardware.
This guide provides a step-by-step process to set up and use Neat Bar with your own device (e.g., Mac or PC) without needing a Neat Pad. Follow these steps for a seamless experience. Everything you need to connect Neat Bar to your TV or monitor is in the box.
What you’ll need
- Internet connection (Wi-Fi or ethernet). To ensure full functionality, please review the network and firewall requirements.
- Display (16:9 aspect ratio) with minimum 1080p resolution (Full HD) or better
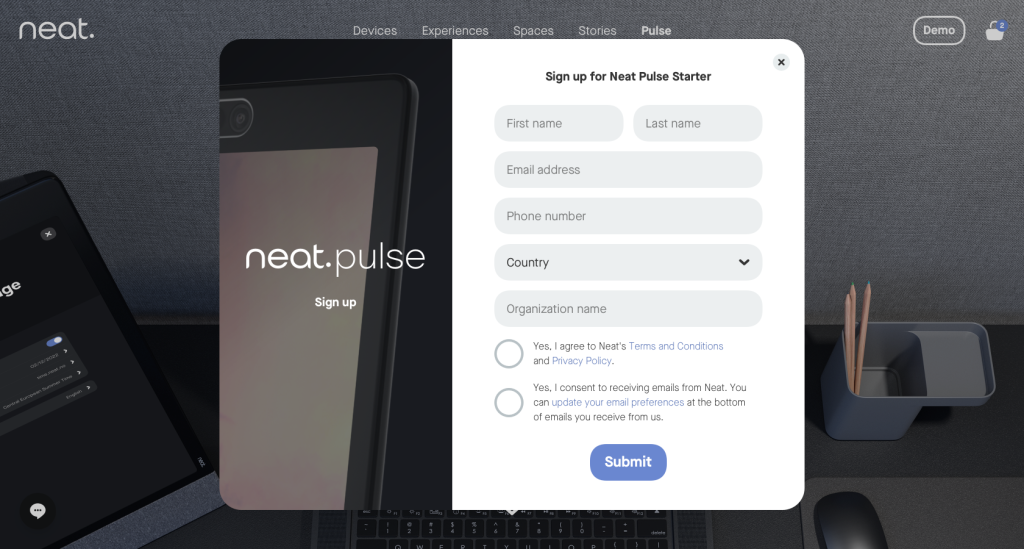
- Neat Pulse
In the box:
- Neat Bar
- Power cord
- HDMI cable (2 meters)
- Ethernet cable
- Mount adapter, wall mount, screen mount, snap-on mount, and table stand
- 2x hex key, 4x M6 screw, 4x M8 screw, 2x spacer
Not included
- USB-C Cable (USB-C to USB-C or USB-C to USB-A)–required for BYOD functionality.
- Extra HDMI Cable (needed for BYOD calls and screen sharing).
- Optional: USB hub or docking station (if using a single cable setup).
Neat Pulse Platform: To use Neat Bar with your own device in BYOD mode, you’ll need to connect it to Neat Pulse–Neat’s platform for managing and updating devices. Essentially, you will need to generate an enrollment code for your Neat Bar–and that’s where Neat Pulse comes in.
Neat Pulse is key for BYOD functionality and ensuring your Neat Bar stays up to date with the latest features. If you’re already familiar with Neat Pulse, your account is active and ready for device enrollment.
If you’re new to Neat Pulse, don’t worry–we’ll walk you through setting up an account and linking it to your Neat Bar. This straightforward process ensures you get the most out of your Neat Bar.
Enroll in Neat Pulse–sign in or sign up:
1. Create a new Neat Pulse account
- Go to pulse.neat.no
- Select get Pulse.
- Fill out the form.
2. Sign in or get invited to an existing Neat Pulse account
- If you already have an account, sign in with your credentials.
- If your company has set up SAML SSO, log in through that.
- Don’t have access yet? Ask your admin for an invite.
3. Create a room
To enroll Neat Bar, you need to create a room first. A room is a virtual user-created group of Neat devices, typically organized by physical location (e.g., “Huddle Room 1” or “Meeting Room A”).
- In the Neat Pulse dashboard, go to the Devices.
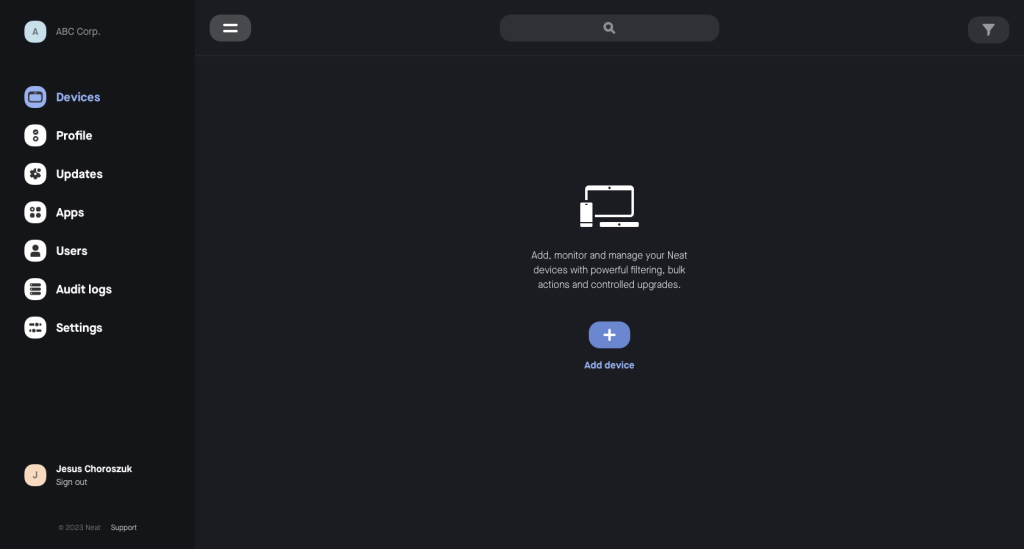
- Choose Add device.
- Name the device’s room: Give it a descriptive name, such as “Meeting Room A.”
- Select or create a location (e.g., Oslo or London) and assign a profile to configure language, time zone, and other default settings. Note: Location and profile are optional for owners, and only the profile is optional for admin users.
- To create multiple rooms at once:
– Click Add more to add additional rows.
– For each row, specify the Name, Location, and Profile. - To save the room, click Continue.
Step 1: Physical setup
Our snap-on mount is custom-made for Neat Bar to fit snugly on top of smaller screens or monitors. The mount attaches to your screen or monitor’s back with adhesive tape and is suitable for any display.
A. Mount or place Neat Bar:
Neat Bar can be mounted above or below your display or placed on a table. Check out our Neat Bar Installation Guide for step-by-step instructions on the best positioning and installation options.
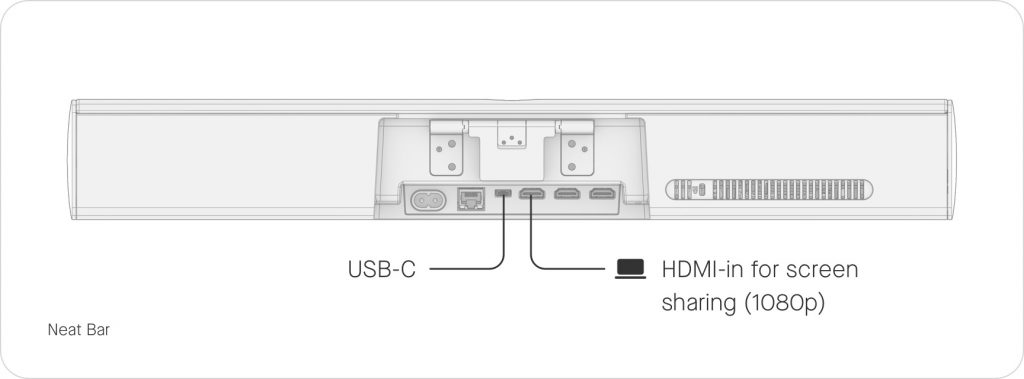
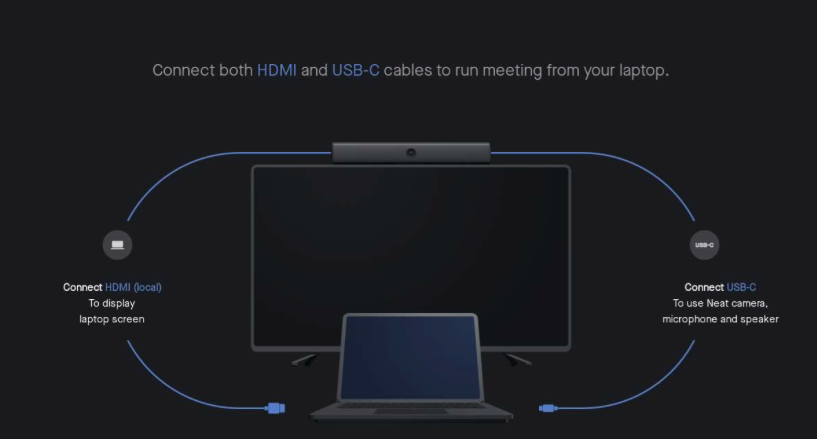
B. Connect cables
- HDMI: Connect Neat Bar to a display via the HDMI cable.
Note: Connect to Neat Bar’s HDMI 1 output if you use a single TV screen.
- USB-C: Connect a USB-C cable from Neat Bar to your computer (but do not connect it to the computer just yet).
Note: A USB-A to USB-C cable (3.0 or higher) can be used if your computer does not have a USB-C port. USB-C to HDMI adapters are also supported for connecting video output.
- Ethernet (Optional): Connect an Ethernet cable if you are not using Wi-Fi.
Note: If you use Wi-Fi, do not connect the Ethernet cable. A Neat device with a wired Ethernet connection will always use Ethernet. To force a Neat device to use Wi-Fi, there should be no wired/Ethernet connection cable physically connected.
C. Alternative setups and cable management:
We’ve designed Neat Bar to integrate effortlessly with third-party equipment like USB hubs, ensuring compatibility with your existing displays and minimal additional costs. Whether you’re equipping a compact meeting room or a larger space, we’ve got you covered with recommended solutions.
- Small spaces: We recommend a monitor with a built-in USB hub for clean cable management. With a built-in USB-C hub and using a single USB-C cable, your monitor reliably charges your laptop while you stay productive— with no extra power adapter needed.
- Medium to large spaces: We suggest using a dedicated USB hub that supports multiple connections for better reach and integration with various display types.
Example for small spaces:
Simply connect your device (e.g., laptop) to the display via USB-C and Neat Bar via USB for seamless operation. It is ideal for compact setups where minimal equipment is key.

Example for larger spaces:
A dedicated USB hub ensures smooth integration with external devices in larger rooms, enabling BYOD functionality without compromising the meeting room setup.

D. Power up
Plug the power cable into Neat Bar and a power outlet.
Step 2: Connect to your Computer
A. Prepare you computer
Ensure you have a Chromium-based browser (e.g., Google Chrome, Microsoft Edge) for the best experience.
B. Plug in USB-C fromNeat Bar to your laptop
- Connect the USB-C cble from Neat Bar cable to your laptop.
- A pop-up will appear (if you are using a Chromium-based browser), directing you to the setup page. Click Open on the pop-up and follow the steps.
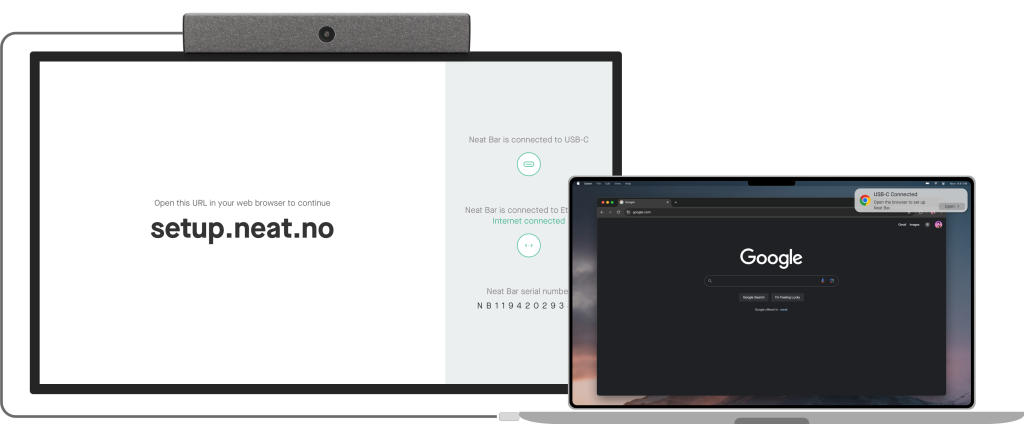
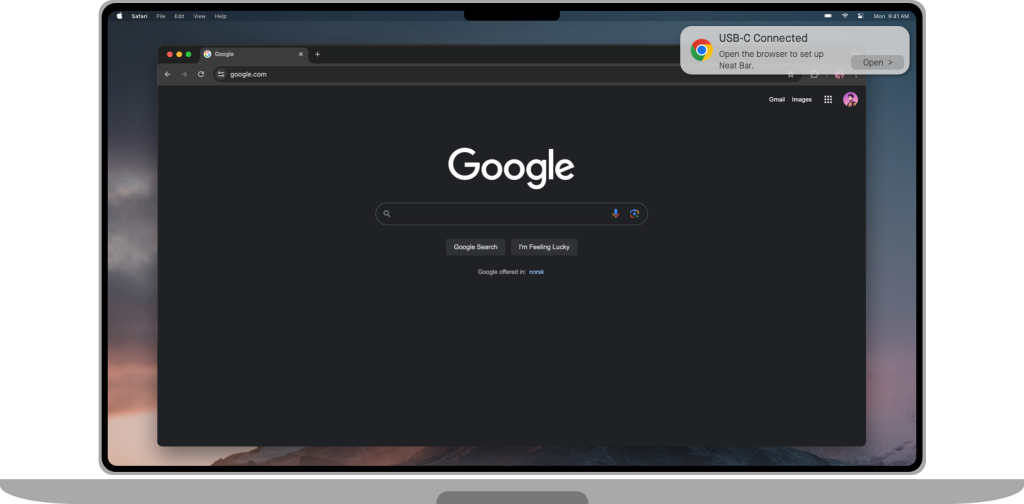
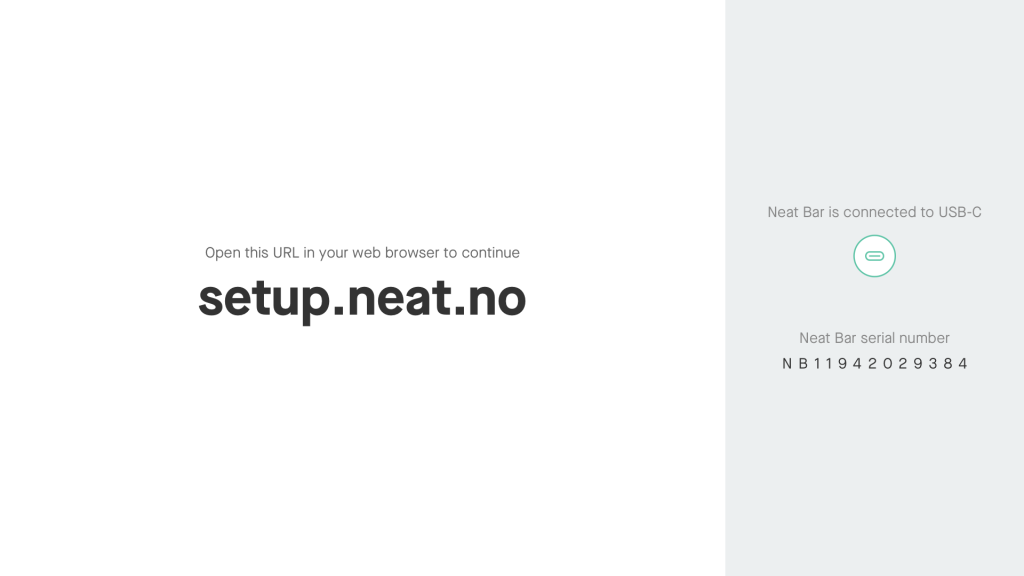
Manually open setup (if no pop-up): Open your browser and navigate to setup.neat.no.
Step 3: Neat Bar setup
A. Follow the on-screen instructions
- The webpage will guide you through the setup process.
- Note: If you’re not using a Chromium-based browser (e.g., Google Chrome, Microsoft Edge), you must enter Neat Bar’s serial number.
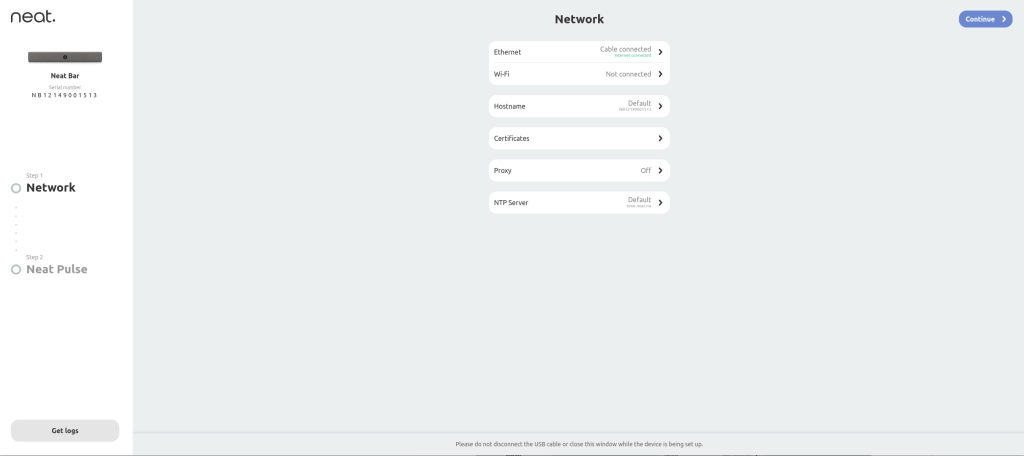
B. Network configuration
- Wi-Fi: Select your Wi-Fi network and enter the credentials.
- Ethernet: If connected, Neat Bar will automatically detect the Ethernet connection.
- Diagnostics (optional): Access advanced network settings for proxies, hostnames, or certificates if needed.
C. Firmware updates
- Neat Bar will check for updates and install them if available.
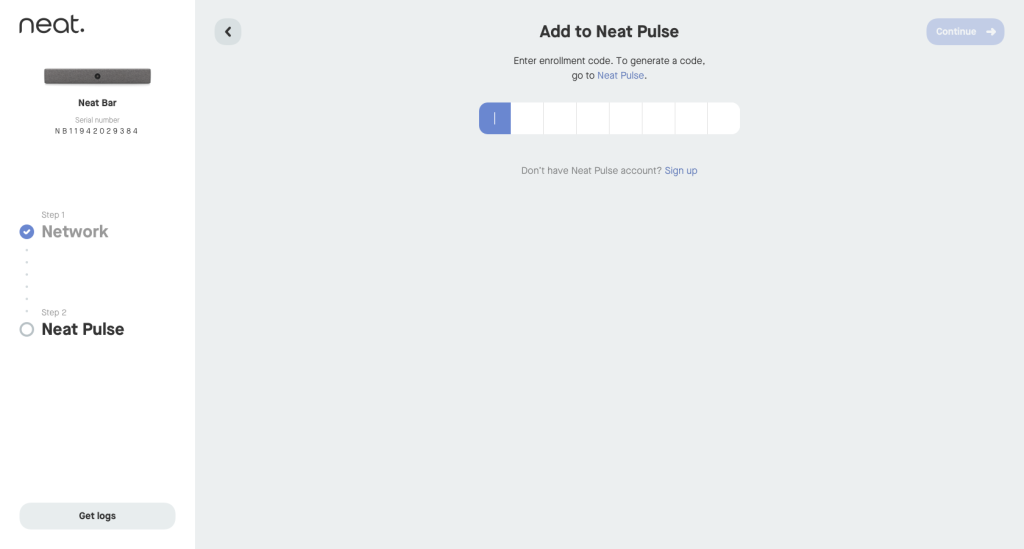
D. Enroll Neat Bar in Neat Pulse
You will be prompted to enter an enrollment code to add Neat Bar to Neat Pulse. Select go to Neat Pulse.
- On the display connected to Neat Bar: Follow the on-screen setup prompts.
- Enter the code generated from Neat Pulse when prompted for the enrollment code.
Step 4: Optimize your setup
Now that Neat Bar is added to Neat Pulse, it’s time to optimize your setup. A diagram will guide you through mirroring or extending your computer’s display by connecting the HDMI cable from your computer to the HDMI-in port on Neat Bar. Once a computer is connected to Neat Bar’s HDMI-in port, your screen will appear on the display(s) connected to HDMI 1/ HDMI 2.
Note: If you connect an HDMI-in cable after completing the initial setup, the image will be mirrored automatically on the connected display(s). Ensure your computer’s display settings are configured correctly if you prefer extended mode instead of mirroring
To mirror your laptop screen to Neat Bar, make sure you’ve selected the right display source. Here’s how you can check:
On Mac
- Open System Settings and go to Display.
- Ensure the correct source is selected for screen mirroring.
- Choose “Neat Camera”
On Windows
- Right-click on your desktop and select Display settings.
- Scroll down to the Multiple displays section.
- Make sure the correct display source is selected.
- Choose “Duplicate these displays” to mirror your laptop screen to Neat Bar.
Important: After connecting Neat Bar to your computer, you may need to manually select “Neat Bar” as both the output and input device in your computer’s system settings
- On macOS, go to System Settings > Sound > Output & Input: select “Neat Bar Speakers” as output and Neat Bar Microphone as input.
- On Windows, navigate to System > Sound and select “Neat Bar” (Echo Cancelling Speakerphone) under both input and output devices.
Test camera and audio
- Ensure Neat Bar’s camera and microphone are working correctly
Customize camera settings (optional):
- Use Neat Pulse to configure framing boundary, default camera mode, and other preferences.
Step 5: You’re all set
You’re now ready to enjoy the seamless Neat experience with your own devices with crystal-clear audio, sharp video, and intuitive functionality.
Simply launch your preferred platform, and let Neat Bar do the rest:
- Smart activation: Neat Bar powers on your meeting space and frames you perfectly. Depending on your system settings in Neat Pulse, Neat Bar self-activates when you walk into the room, immediately turning on your meeting room monitor and checking you into the room. It also instinctively frames you perfectly and auto-releases the room when you leave.
- Effortless integration: Enjoy the ultimate BYOD convenience with no compromise on quality.
Important Tips
- Cables: Make sure you have all the necessary cables before starting setup.
- Browser compatibility: Chrome or Chromium-based browsers offer the best setup experience.
- Support: If you encounter issues, visit Neat Support or contact customer service.
Note: Neat devices use open-source software components. You can view the Open Source licenses by navigating to http://IP_ADDRESS:8443/NOTICE.html in your browser, replacing IP_ADDRESS with the actual IP address of your Neat device.
This guide ensures you can set up and use your Neat Bar effectively with your own device. For more advanced features and management options, explore Neat Pulse settings after setup.
Troubleshooting
Why isn’t my computer recognizing Neat Bar?
- Ensure the USB-C cable is connected correctly.
- Try using a different USB-C port or an adapter if necessary.
- Restart both Neat Bar and your computer.
Why isn’t my Neat Bar displaying on the TV/monitor?
- Confirm that the HDMI cable is securely connected.
- Make sure your display is set to the correct HDMI input source.
- Try using a different HDMI cable or port.
Why isn’t audio working through Neat Bar?
- Ensure Neat Bar is selected as the audio input/output device in your system settings.
- Check that the volume is not muted on both your computer and Neat Bar.
Why isn’t Neat Bar working in BYOD Bar only mode?
- When using Neat Bar in BYOD Bar-only mode, it works as a USB NCM (Network Control Model) device. This means the connected PC needs to support USB NCM for the Neat Bar to function correctly. Put simply, USB NCM is a way for the Neat Bar to act like a network adapter over a USB connection, creating a network link between the PC and the device.
Does my Windows PC support USB NCM?
- USB NCM support is included starting from the Windows 10 May 2019 Update (build 18362). Read more about USB NCM support on Windows.
Is my company security policy affecting Neat Bar’s functionality?
- Verify whether company security policies are blocking USB to Ethernet adapters on the host PC, as this can prevent Neat Bar from functioning correctly.
Is DHCP configuration enabled for the NCM network interface?
- Ensure that the host PC allows DHCP address configuration on the NCM network interface, as this is necessary for network communication.
Why should I avoid connecting multiple devices simultaneously over NCM?
- The NCM interface uses a hardcoded static IP address (192.168.42.129). If multiple devices are connected at the same time, they will attempt to use the same IP address, causing address conflicts and network instability. Always connect and configure one device at a time when using NCM to avoid these issues.
For additional troubleshooting, see the Troubleshooting section in this article (USB NCM on Factory OS).