How to Enable Remote Access on Neat Devices
Last updated on May 28, 2026
Neat’s Remote access feature allows administrators to log in to Neat’s web admin via a web browser and access/retrieve useful information. From this server, you can collect logs, upload certificates, view general system information, and configure audio and video settings.
Contents
- 1. Enable remote access
- 2. Remote access: Status page
- 3. Remote access: Time and language page
- 3. Remote access: Audio and video page
- 4. Remote access: System
- 5. Remote access: Access settings and password management
1. Enable remote access
1.1 After OOB setup
On Neat Pad, Neat Board, or Neat Frame:
Step 1: First navigate to Neat’s System Settings.
Using Zoom: Click on Zoom Settings -> General -> System Settings -> Enter passcode* -> you will now enter Neat’s System Settings. (*Zoom Room passcode is 00000 by default; alternatively, go to Zoom admin portal, navigate to Room management -> Zoom Rooms-> find your Zoom room and click ‘Edit’ next to its name -> Rooms profile and search for ‘Room Passcode’. Some users may not be required to enter a passcode.)
Using Microsoft Teams: Click on Microsoft settings More (…) -> Settings -> Device Settings -> you will now enter Neat’s System settings.
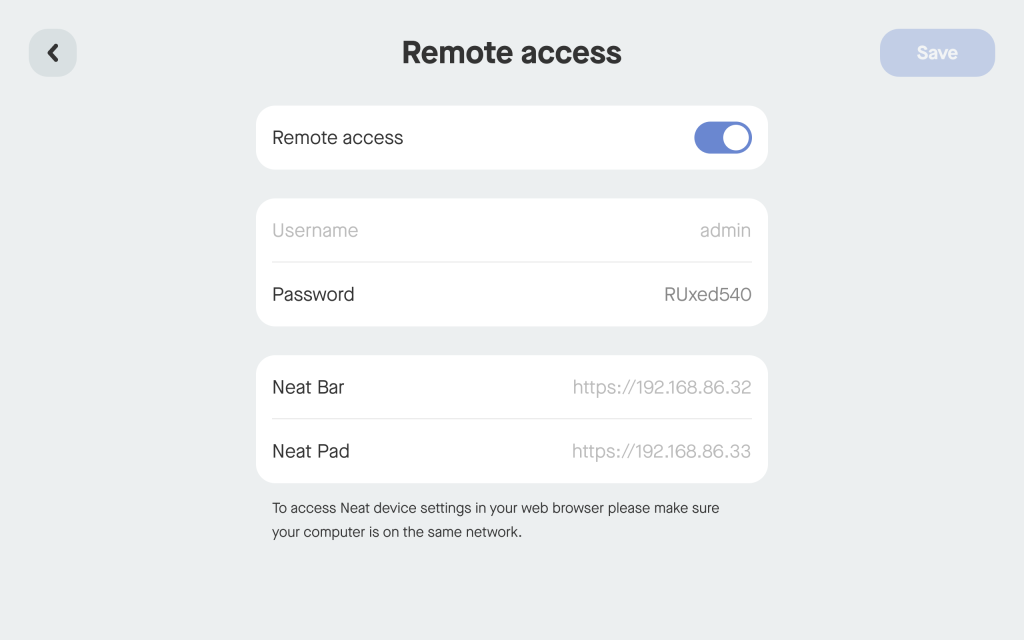
Step 2: From Neat’s System Settings, navigate to System -> Remote access -> toggle the option to enable it.
Step 3: You will now need to enter a password and it must be at least 8 characters long. The default username is admin.
Step 4: Once you have set the password, you will see the following messages on the Neat Pad (a similar message will be displayed on the Neat Board/Frame):
- Neat Pad https://<ipaddress_of_NeatPad>
- Neat Bar https://<ipaddress_of_NeatBar>
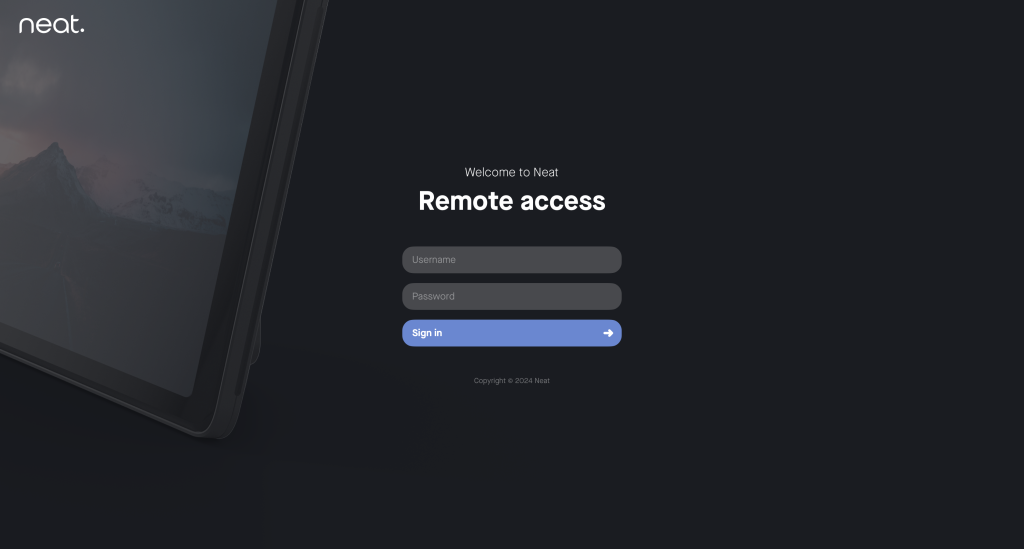
Step 5: Now you can open your computer’s web browser and navigate to https://<ip_address> (where ip_address is the Neat device’s IP address).
Note: Your browser will most likely report the website to be untrusted as Neat will provide its self-certified root certificate. You can accept this warning and move forward on the webpage. Some browsers will not allow you to bypass the error and in that case, please use a different web browser.
Step 6: You will now see the following login prompt on your browser. Enter the credentials you have set up in Step 3 (default username is admin).
1.2 During OOB setup
- Press and release the reset number at the back of each device to see the About this Neat device page and make a note of the IP address and Serial number (which is also physically written on the back of the device).
- Access your Neat device’s web admin server from your web browser by typing https://<IP_address_of_Neat_Device>
Note: When downloading logs from Neat Bar/Bar Pro, please make sure you download logs from both Neat Bar/Neat Bar Pro and Neat Pad by navigating to each device’s web admin server. - Sign in to the web admin server using the following credentials:
- Username: oob
- Password: Entire serial number of device e.g NA11000000000 (for Neat Pad)
2. Remote access: Status page
Once you log in, you will see the following Status page. This page will provide you with details about the device, such as its MAC address, serial number, firmware version and IP address. On the left side, you can choose between the Status, Time & language, Audio & video, and System pages. In the bottom left corner, you can view your Access Settings or Logout from the remote access web server.
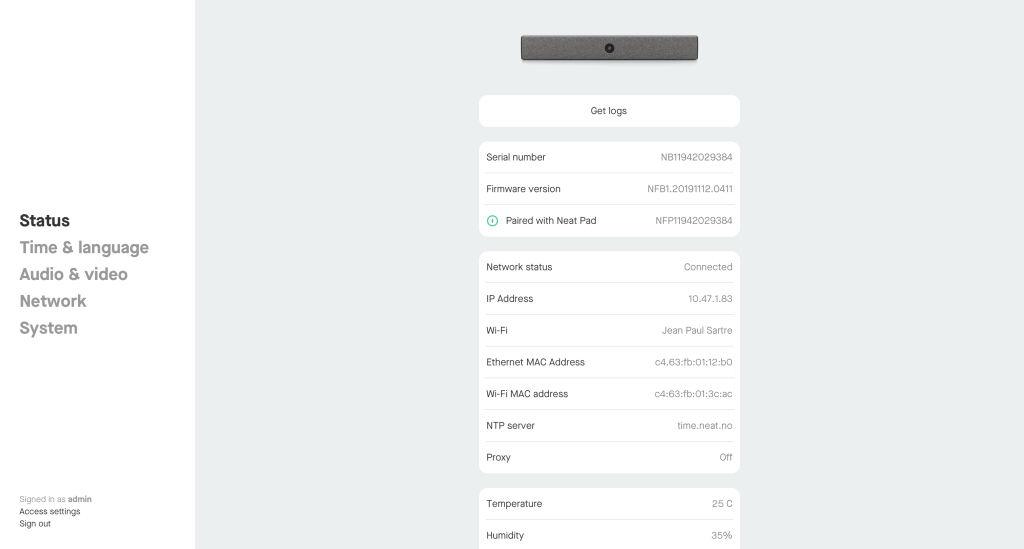
The Status page (Figure 2) allows you to download logs and view general system information, such as MAC addresses, IP addresses, serial number, firmware version, NTP server, etc.
2.1 Downloading logs
On the Status page, you can download the logs from the device by clicking the Get logs button. When downloading logs from Neat Bar/Bar Pro, please make sure you download logs from both Bar and Pad.
IMPORTANT: Rebooting removes the previous log from the device. If you have been asked to provide logs, please reproduce the issue and download the logs before rebooting.
Note: It is not possible to view the downloaded log as it will be in an encrypted format (file extension .p7m).
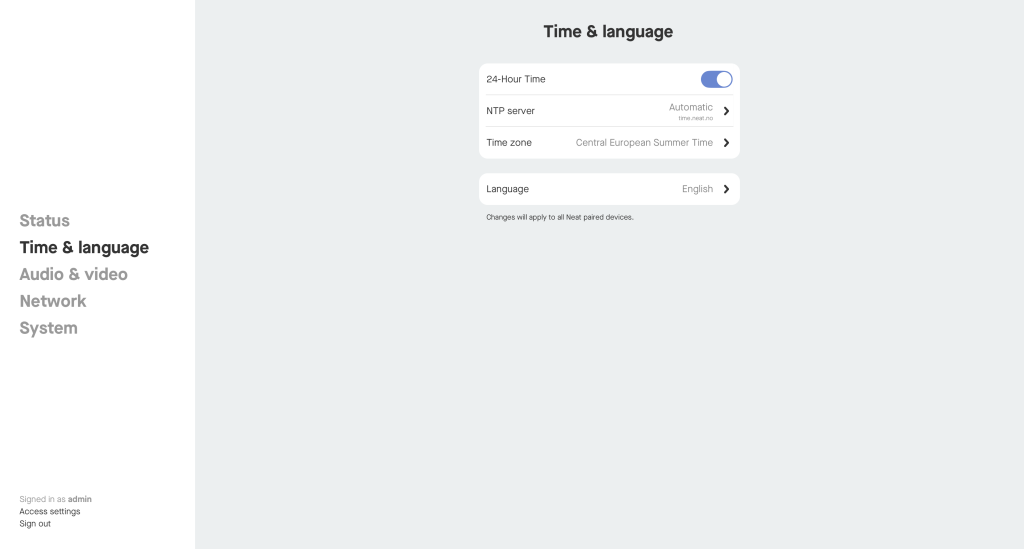
3. Remote access: Time and language page
On the Time and language page (Figure 3) you can edit the time and language settings on your Neat device.
Note: Time & language settings are only available via the web admin server on the Neat Bar, Neat Bar Pro, Neat Board, and Neat Frame. These options are not available on the Neat Pad’s web admin server.
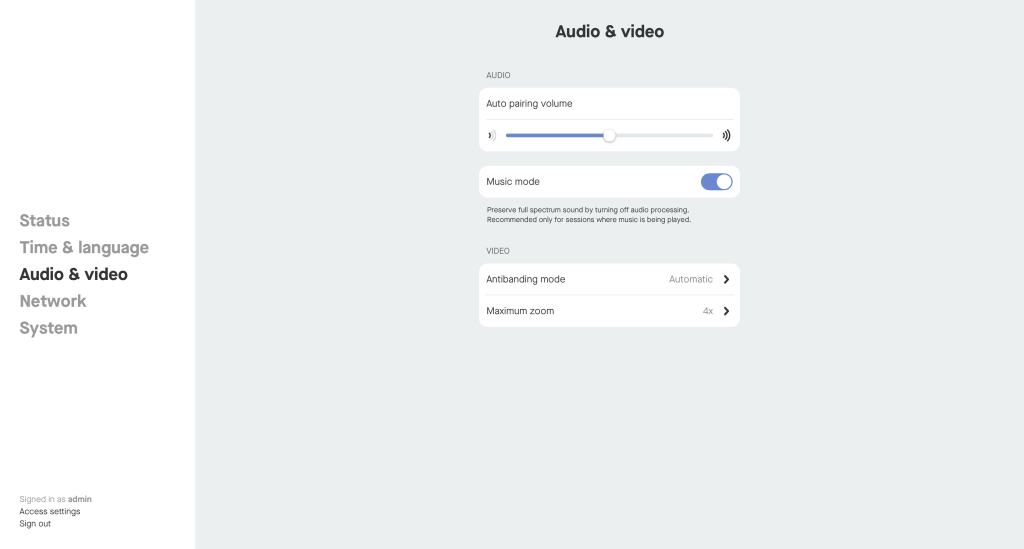
3. Remote access: Audio and video page
On the Audio & video page (Figure 4) you can edit the audio and video settings on your Neat device. Music mode can only be enabled and disabled from the web admin server. Any changes made to these settings while the device is in a meeting will take place after the meeting ends.
Note: Audio & video settings are only available via the web admin server on the Neat Bar, Neat Bar Pro, Neat Board, and Neat Frame. These options are not available on the Neat Pad’s web admin server.
The Maximum zoom functionality is only available on Neat Bar and Neat Board.
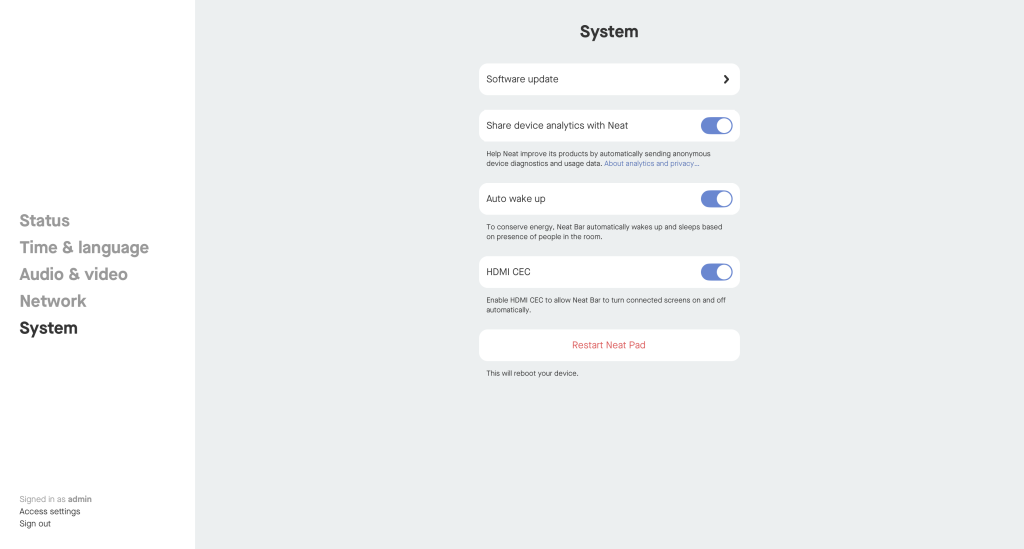
4. Remote access: System
On the System page (Figure 5) you can update your device, opt to share analytics, enable and disable Auto wake up, and upload certificates and reboot the device. Certificates can only be uploaded to the device from the web admin server.
Note: Settings on this page aside from “Certificates” are only available via the web admin server on the Neat Bar, Neat Bar Pro, Neat Board, and Neat Frame. These options are not available on the Neat Pad’s web admin server.
4.1 Uploading certificates
In certain deployments it may be necessary for a proxy server to perform SSL inspection due to the company’s security practices. If such a proxy server is used, Neat and Zoom or Microsoft will need to trust the certificate presented by the proxy server to establish a TLS connection.
It is possible to upload a Certificate Authority’s (CA) X.509 certificate to Neat’s trust store so that the device is able to establish successful TLS connections with such proxy servers. The CA certificate will be used by Neat firmware and Microsoft Teams or Zoom software to validate the proxy server’s Server Certificate during a TLS handshake.
By clicking on the ‘Certificates’ option, you will be able to add certificates to Neat’s trust store and view any certificates that have already been added.
Certificates can be uploaded during the out-of-box setup guide, before the user-selected Remote Access password is configured; to use this method login with username “oob” and the password of the Neat device’s full serial number, such as NA12345678901
IMPORTANT: Once you upload a certificate, please reboot your Neat device. If you have a paired Neat Bar/Bar Pro and Neat Pad, you will need to upload the CA certificate to both Neat Bar and Neat Pad’s trust stores and reboot both devices.
Neat supports .pem/.der/.cer/.cert/.crt file formats.
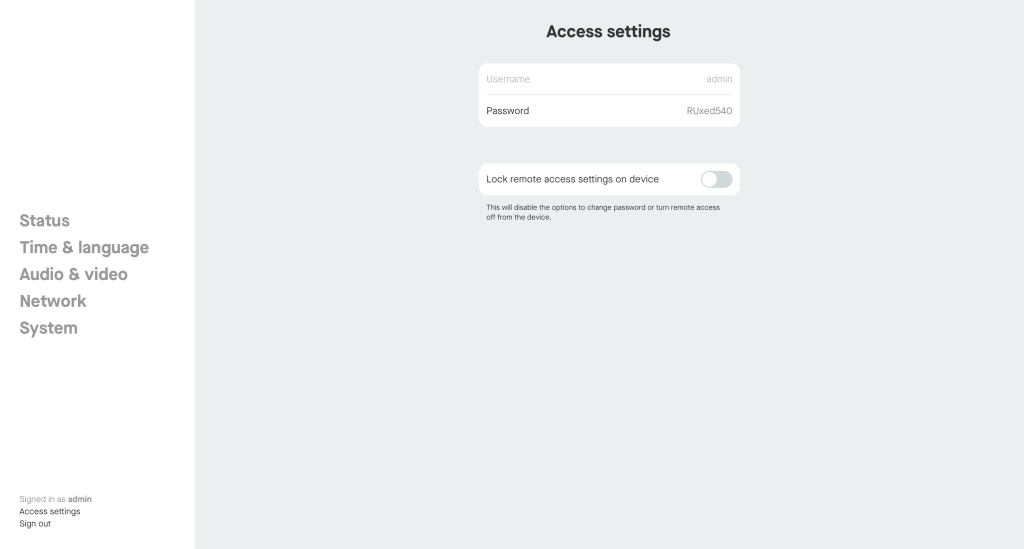
5. Remote access: Access settings and password management
On the Access settings page (Figure 5) you can manage your remote access password and lock remote access settings on your device.
5.1 Manage remote access password
You can remotely change the Remote access password from the Neat Bar, Neat Bar Pro, Neat Board and Neat Frame’s web admin server. In addition, it is also possible to ‘Lock remote access settings on device’ so that it is not possible to change the password or turn remote access off from the device (this option is disabled by default).
Please navigate to the Neat Bar/Bar Pro, Neat Board or Neat Frame’s web admin and once you log in, click on the ‘Access settings’ on the lower-left corner. You can then change the password as well as lock remote access settings on the device.
5.2 Hide remote access password
After enabling remote access for the first time, you are able to lock the settings on the device so the password can no longer be changed. Once you enable lock remote access settings, the Neat Pad, Neat Board, or Neat Frame’s Remote access settings will no longer show a password field and instead advise the user to sign in from the web browser to make any changes.