How to Set up your Neat Board for BYOD Mode
Last updated August 21, 2024
While Neat devices deliver great experiences with Zoom Room and Microsoft Teams Room applications, we recognize that you may need to join meetings on other platforms. For these situations, BYOD Mode allows you to use Neat devices with any video service, while still benefiting from Neat’s advanced hardware and features.
This guide provides step-by-step instructions for enabling BYOD Mode on your Neat Board. For instructions on other devices, see:
- Neat Bar + Bar Pro – How to Set up your Neat Bar/Bar Pro for BYOD Mode
- Neat Bar Gen 2 + Neat Board 50 – How to Set up your Bar Gen 2 /Board 50 for BYOD Mode
Warning: When running a Neat device in BYOD mode, the videoconferencing application installed during out-of-box setup (Zoom or Teams) is terminated. Because the application cannot communicate with its cloud, you may see the devices appear offline in your Zoom or Teams cloud admin portal. Connectivity to Neat Pulse is maintained during BYOD Mode.
1. Requirements
- Personal Computer that supports HDMI-Out through direct or dongles
- USB-C to USB-C or USB-A to USB-C cable (3.0 or higher)*
- HDMI Cable (existing content-share HDMI cable can be used for BYOD Mode)
- Note: USB-C to HDMI adapters are supported.
*Note: Currently, BYOD Mode supports only High-Speed (USB 2.0) data transfer rates due to temporary software limitations. Super Speed (USB 3.0) cabling is recommended for future updates supporting Super Speed connectivity.
2. Instructions
2.1 Accessing USB Connectivity and BYOD Mode
- Navigate to Neat’s System Settings.
- For Zoom: Settings -> General -> System settings
- For Microsoft Teams: More -> Settings -> Device settings
- Then, navigate to Neat System Settings -> System -> USB Connectivity, where you can select:
- Auto BYOD mode or
- Peripheral devices (default configuration, i.e., BYOD mode disabled)
2.2 Selecting between different BYOD Mode
2.2.1 Automatic BYOD mode
In Automatic BYOD Mode, USB passthrough functionality is fully automated. Once the Neat devices are wired as described in Section 2.3 (“Setting Up Cables for BYOD Mode”), they will automatically function as USB-connected peripherals for a computer.
2.2.2 Peripheral devices
This mode indicates that BYOD mode is disabled but allows the USB connection to be used for peripherals such as a mouse or keyboard.
2.2.3 USB extenders
This setting is designed for customer setups that use specific types of USB extenders for BYOD (Auto/Manual mode). Most USB extenders rely on a V-BUS line connection, which typically carries a 5V supply, to trigger the electrical components within a USB device. However, a small subset of extenders do not switch this power on or off based on the presence of a laptop. Instead, they send suspend commands when the laptop is disconnected or when the USB extender enters power-saving mode.
When the USB extender option is enabled, Neat devices will listen to the suspend command from the USB extender. When the toggle is off, the Neat device will instead rely on the V-BUS line connection to enable or disable BYOD mode.
2.3 Cable Setup
- Connect one end of the required HDMI cable to the HDMI-in (local) port on the back of Neat Board (Figure 1) and the other end to your computer. Unlike other Neat devices, Neat Board will need an HDMI signal from your laptop.
Important Note: For Neat Board, the HDMI cable must be connected FIRST to activate BYOD Mode on your Board.
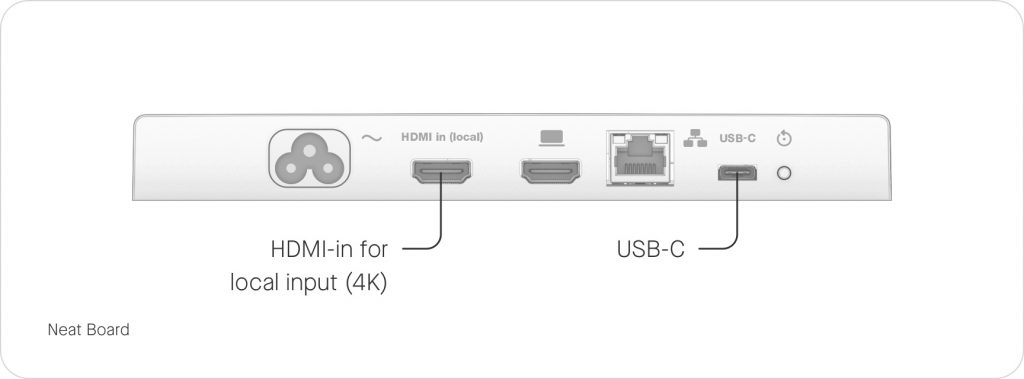
- Once you see your computer’s display mirrored or extended to the Neat Board, connect one end of the USB-C cable to the back of Neat Board (Figure 1) and the other end to your computer. BYOD Mode will automatically commence.
2.4 Set Neat Device as your default Video and Audio Devices
- Open your preferred video conferencing application on your computer.
- Set the default devices for the camera, microphone, and/or speakers to the Neat Device (named ‘Neat Board…’).
- You can enable only the hardware you need. For example, use the Neat device’s camera and microphone while using your computer’s built-in speakers etc.
Note: If you are having issues with adjusting the volume on Mac devices, please review this article by Apple on adjusting sound output settings.
Platform Setup Articles:
- Zoom – Changing Video and Audio Settings
- Microsoft Teams – Changing your default mic, speakers, or camera
- Webex Teams – Choose your audio and video settings
- Google Meet – Change your Video and audio settings
- FaceTime -Choose a camera or Microphone
3. BYOD behavior
- Once BYOD is activated you will be able to select the mic, camera, and speaker of the Neat Board from the conferencing application running on your laptop.
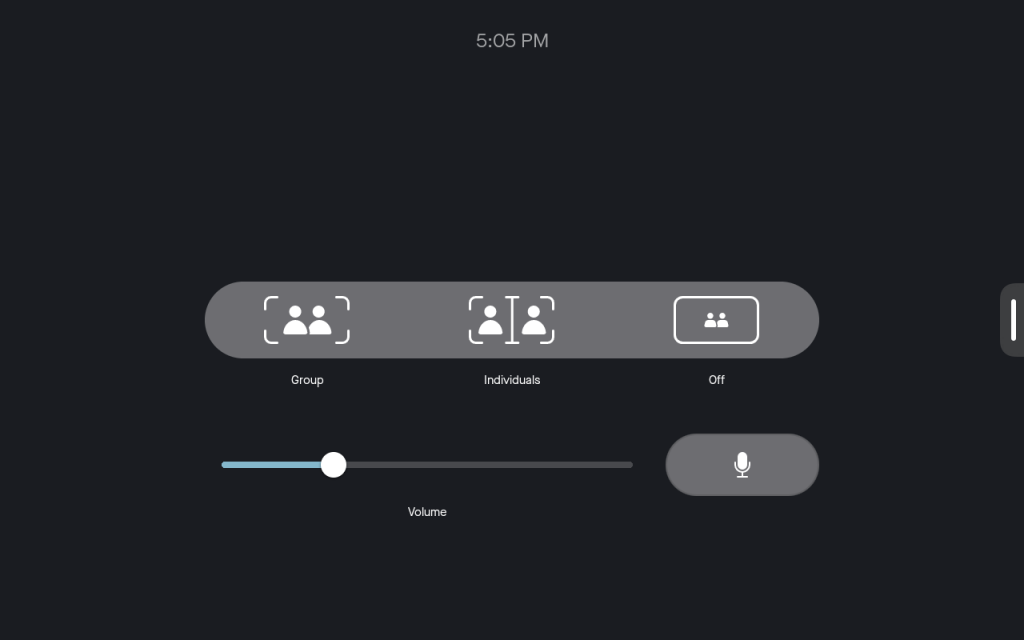
- Camera controls can be accessed from the Swipe left menu. If a Neat Pad is paired to Neat Board at the Neat level it will also switch to BYOD mode and provide the camera control directly on Neat Pad.
Please Note: BYOD Mode will be disabled if your computer goes into Standby/Sleep as Neat Board will no longer detect a signal over the cable(s) connected to your device.
Enjoy the Neat experience on any platform!
With this, you should be fully set to use your Neat Bar or Neat Board with any video conferencing application!