How to Set Up Neat Center(s)
Last updated February 17, 2026
Neat Center is a companion device that extends the capabilities of Neat devices and dynamic framing, enabling remote meeting attendees to enjoy enhanced context and engagement for a more inclusive hybrid meeting experience.
This article offers simple, step-by-step instructions for setting up your Neat Center, whether during the initial installation or after a factory reset.
Contents
- Planning your room layout?
- 1. Prerequisites
- 2. Known limitations
- 3. What’s Included in the box
- 4. Mounting your Neat Center
- 5. Powering up your Neat Center
- 6. Connecting Neat Center to the Internet
- 7. Pairing your Neat Center to your main Neat Device
- 8. (Optional) Multi Neat Center (Beta)
- 9. Neat Center Camera Controls and Custom Configuration
- 10. Unpairing and resetting the Neat Center
Planning your room layout?
Before mounting or pairing Neat Center, we recommend reviewing the Neat Center Room Design Guide (PDF).
This guide covers best practices for positioning one or multiple Neat Centers in different room layouts—especially larger or more complex spaces—to ensure optimal video framing, audio pickup, and meeting equity.
Important Note: As of NeatOS 25.4, you can now set up two Neat Centers with your front-of-room (FoR) device. Multi Neat Center setup is only supported on Generation 2 Neat devices (e.g. Bar Gen 2, Bar Pro, Board 50, Board Pro). The instructions in this article apply to the setup of both the first and second Neat Center in your setup. See Section 2 for any known limitations.
1. Prerequisites
Here are the prerequisites for installing Neat Center:
- Neat Center is a companion device in a pre-established Neat Room alongside our main devices. It can be setup with the following devices, provided they are running Neat OS 24.2.0 or later. These devices must already be installed as a Zoom or Microsoft Teams room or App Hub or BYOD-only before Neat Center is added as a companion device.
- Neat Board
- Neat Board 50
- Neat Board Pro
- Neat Bar / Neat Bar 2
- Neat Bar Pro
- All devices (i.e. the Neat Center, the main Neat Pad controller and the main Neat room device) must be on the same wired subnet to be able to pair successfully and operate.
- Neat Center uses two mDNS service strings: _neat._tcp and _neat-oob._tcp
- Network and Firewall requirements for Neat devices must be met
Note: Neat Bar requires a paired Neat Pad to support Neat Center. Deployments without a Neat Pad are not compatible.
2. Known limitations
Neat Center does not currently support the following features available with other Neat products. These include:
- Wifi
- 802.1x
- Static IP address
- Only one Neat Center can be used for each Gen 1 FoR Neat device (Bar and Board) (as of Neat OS version 25.4)
- At the time of writing, updating the Neat Center software is not available from ZDM or TAC.
Note: Neat Center now supports custom NTP and proxy servers. For more information, see: Neat devices: Versions 24.5.0 and 24.5.1 Release Notes.
3. What’s Included in the box
Inside the box, you’ll find:
- The Neat Center
- Ceiling-mounting/Table-mounting hardware
- Ethernet Cable (5 m/16 ft)
- Quick Start Guide
- (Optional) PoE Adapter – Power-Over-Ethernet injector with several international power plugs.
Note: Ceiling-mounting hardware is only necessary if you intend to mount your Neat Center on the ceiling.
4. Mounting your Neat Center
The Neat Center offers three mounting choices: Freestanding, Fixed-to-table, or Ceiling-mounted.
Watch the interactive guide Neat Center Mounting Guides for step-by-step instructions tailored to your chosen mounting option.
Important: For the best video and audio performance, we recommend table mounting. If table mounting is not an option it’s important to note that the higher the Neat Center is mounted the more likely you are to experience degraded performance.
Important: For ceiling-mounted setups, we recommend positioning the Neat Center above eye level for seated participants, ensuring an unobstructed view for all participants. Anything above 70″ / 1.8m high is not recommended.
Note that Neat Center is also tripod mount compatible (1/4-20 UNC threads).
5. Powering up your Neat Center
5.1 POE (Power-over-ethernet)
If your network supports Power-Over-Ethernet (PoE), connect your Neat Center directly to an Ethernet port using the supplied Ethernet cable to receive both network and power.
Important: Neat Center supports IEEE 802.3af Class 0 Mode A and B.
5.2 Using the POE injector/adapter (optional extra)
If PoE isn’t available, utilize the PoE injector/adapter to power your Neat Center. The PoE injector features two interfaces:
- a Power interface, indicated by an icon depicting a Pad with a finger, to supply power to the Neat Center;
- a LAN interface, depicted by a wired LAN icon, to connect the Neat Center to your wired network. See Figure 1.
To power the Neat Center:
- Connect it to the PoE injector’s Power interface using an Ethernet cable.
- Plug the PoE injector into your power outlet or socket.
- Link the PoE injector’s LAN interface to your network port using another Ethernet cable.

6. Connecting Neat Center to the Internet
Once the device is connected to ethernet it will automatically boot up and initiate a software update (if required). The LED ring indicates the progress of the update. The update is finished when the ring is complete and will be ready to pair as soon as the LED begins pulsing.
7. Pairing your Neat Center to your main Neat Device
Please watch the interactive guide Neat Center pairing guide to pair Neat Center to the main Neat device. When it is ready to be paired, the LED ring on Neat Center will be pulsating.
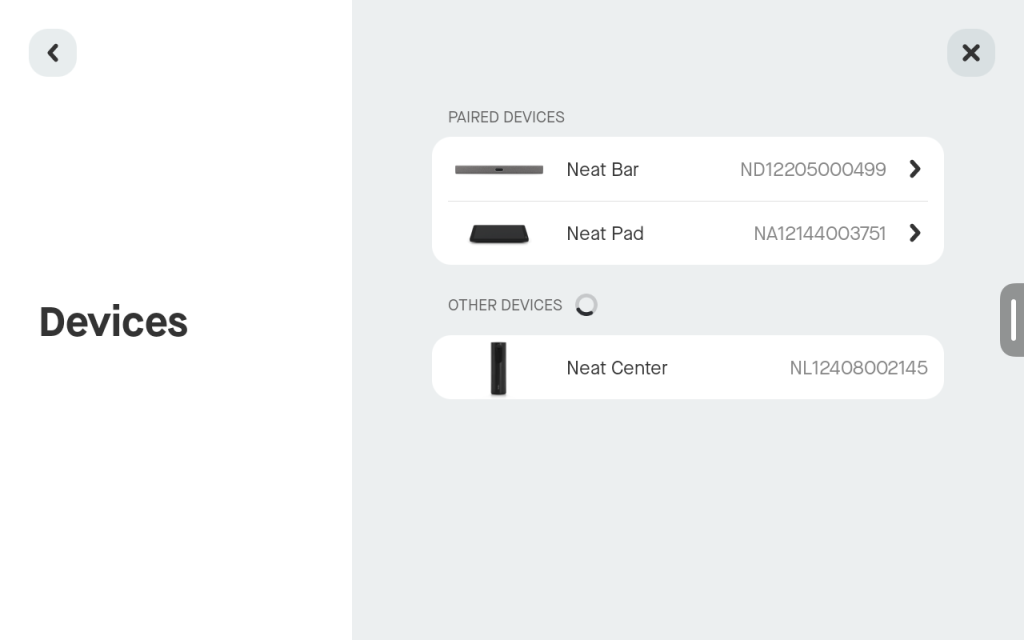
- On the Neat Pad (or Neat Board) that you wish to pair Neat Center with, go to More > Settings > Device settings, and sign in as admin. Then select the Neat Center with the corresponding serial number.
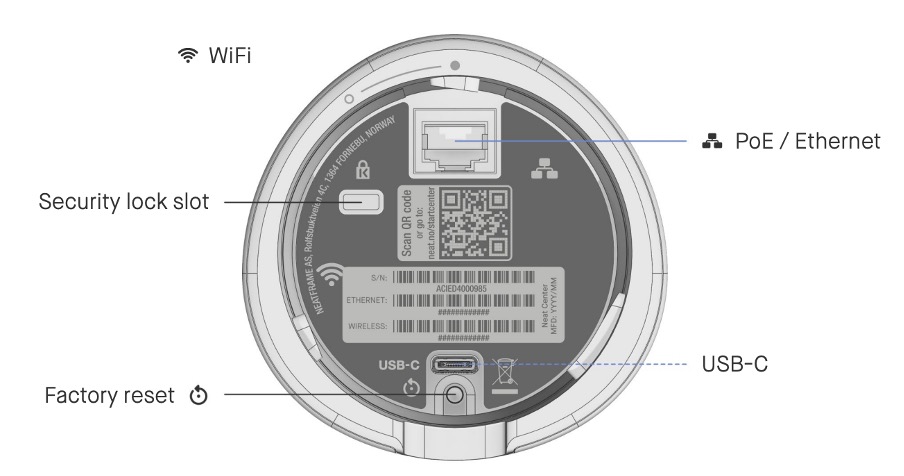
Note: You can find the serial number on the underside of the packaging or close the connectors on Neat Center.

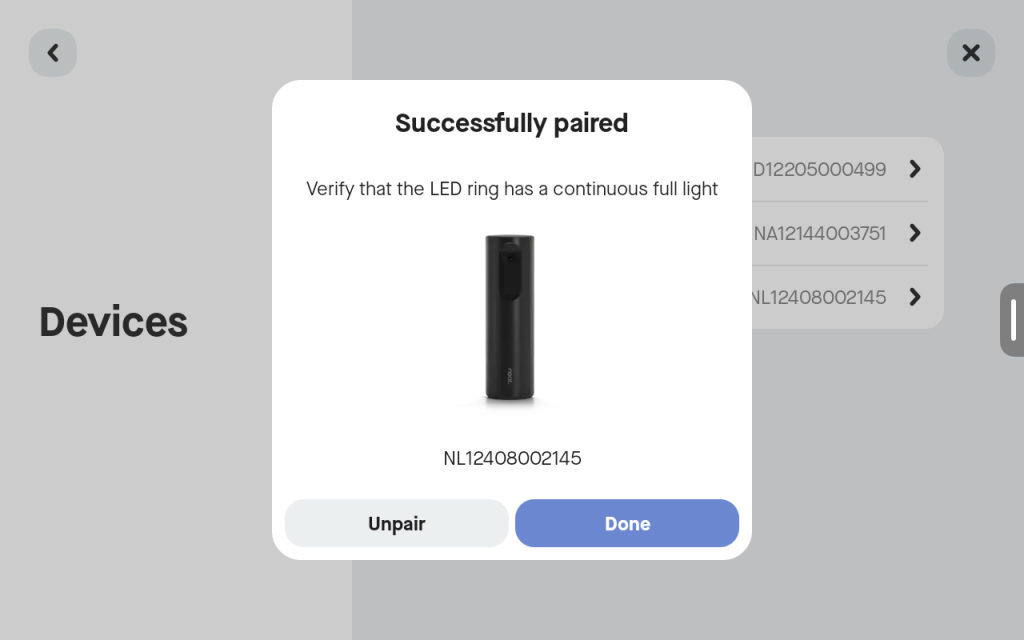
- Your Neat device will begin the paring process which should take a few seconds to complete.
- A fully illuminated LED ring confirms the successful pairing between Neat Center and your front-of-room Neat Device.
8. (Optional) Multi Neat Center (Beta)
As of Neat OS 25.4, multi Neat Center setups are supported with Generation 2 Front-of-Room devices (i.e. Neat Bar Gen 2, Neat Bar Pro, Neat Board 50, and Neat Board Pro).
To add a second or third Neat Center to your setup, repeat steps 3–7 from this article.
Note: When two or more Neat Centers are paired with your Front-of-Room device, they will appear in the interface as Neat Center 1, Neat Center 2, Neat Center 3 according to the order in which they were connected and paired.
9. Neat Center Camera Controls and Custom Configuration
Once your Neat Center(s) are set up, you can choose which cameras to use and adjust their behavior to suit your room layout.
For detailed instructions, see Camera Framing Options for Neat Center.
10. Unpairing and resetting the Neat Center
If you want to remove Neat Center(s) from your existing room, either to use in a different setup or to recover it from an error state, you can follow the steps below.
10.1 Unpairing and resetting a ‘working’ Neat Center
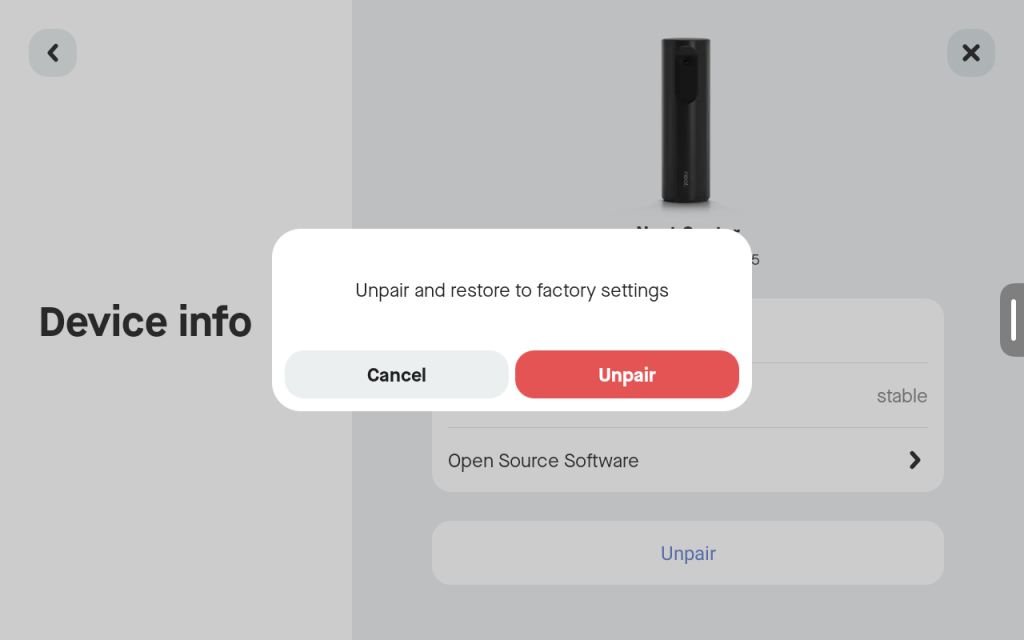
- On the Neat Pad/Neat Board, go to Settings > Device settings > select the Neat Center. It will now open the Device Info screen for the selected device.
- Click Unpair. A pop-up box displays (see Figure 7).
- Click Unpair in the pop-up box. It will now unpair the Neat Center and restore it to factory settings (out-of-box or OOB state), ready to be paired again (LED will be pulsating when it is ready to be paired).
10.2 Unpairing and resetting a ‘non-working’ Neat Center
If you have a Neat Center that is currently in an error state, and unpairing and restoring it to factory settings from the main Neat device doesn’t work, you can follow the steps below to recover it:
- On the Neat Pad/Neat Board, go to Settings > Device settings > select the Neat Center. It will now open the Device Info screen for the selected device.
- Click Unpair and if you get an error that says Unable to unpair Neat Center, click Try again.
- Neat Pad/Board will next report that the device is no longer connected. It will now ask you to manually reset the device and then tap Forget device.
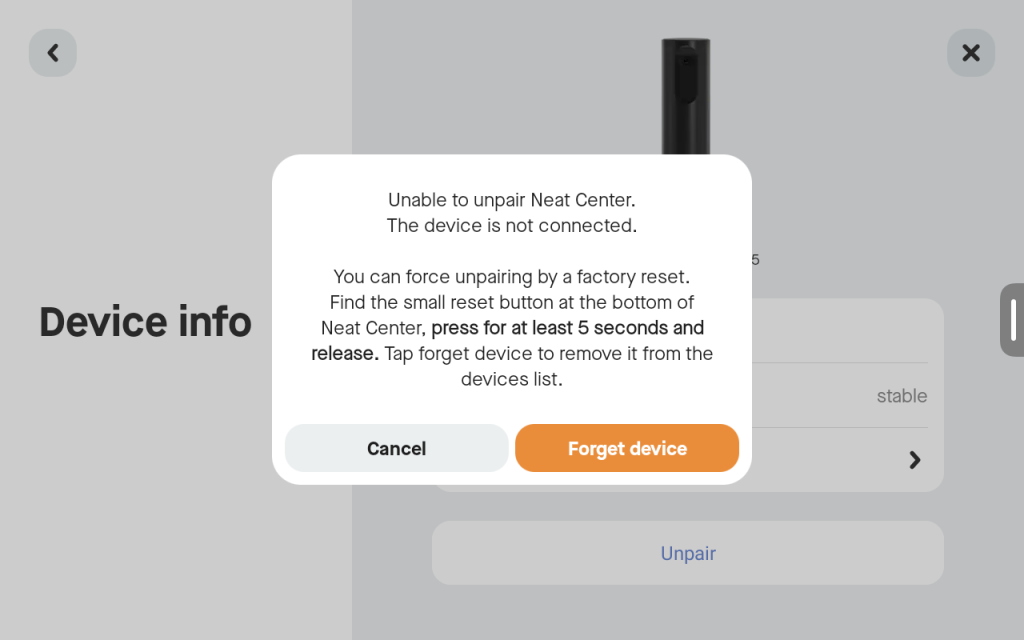
The factory reset button is located at the bottom of the Neat Center as shown in Figure 9. Press and hold it for at least 5 seconds and release it to reset the device back to its OOB state. Once it has been factory reset, it will be ready for pairing again (the LED will be pulsating when it is ready).

That’s it! You are now ready to start using your new Neat Center!