Neat Pulse Alerts and Events
Last updated February 27, 2026
Pulse version 2-15 introduces support for Alerts and Events to help improve security and reliability for integrations. This initial implementation uses webhooks to deliver alerts and events.
Note: At the time of writing, this feature is only available to anyone in “open beta”.
The Neat Pulse alerts and events feature is a part of paid Pulse plans and can only be accessed by Pulse users with the Owner role.
Contents
- Overview
- How it works
- How to register a webhook
- Requirements and security
- Managing webhooks using the Pulse UI
Overview
Neat Pulse Alerts and Events let you send near-real-time messages to other systems when an event occurs. This can be used for many different things, such as alerting, automations, gathering data etc.
How it works
An event corresponds to a change somewhere in a Neat deployment. The change can be related to a device, a space, an entire organization/Pulse account etc.
When an event occurs, Pulse sends a message describing the change to a URL using the HTTP POST method. The receiving service then parses the message and decides what to do next.
Pulse events are agnostic and always describe a state change, meaning that Pulse doesn’t have a notion of what a healthy or unhealthy state is. This is always up to the receiver to determine.
How to register a webhook
- You can register a webhook either in the Pulse UI or using the webhook API.
- Name your webhook and choose one or more events you want to subscribe to. Choose configurations, if applicable.
- When an event occurs, Pulse POSTs a message to the webhook endpoint/URL you specified.
- The webhook lifecycle (update, delete etc) can be managed both from Pulse UI or using the API.
Note: Neat Pulse API documentation is available here: https://api.pulse.neat.no/docs/
Requirements and security
Scope
Currently, all events are scoped to an organization, meaning that you cannot create a webhook to monitor changes for just a subset of your devices.
Receiver requirements
Your webhook endpoint must:
- Use https:// with a valid TLS 1.2+ certificate and FQDN.
- Accept HTTP POST with application/cloudevents+json.
- Respond with 2xx within 10 seconds.
- Be reachable from the public internet.
Activation, limits and audit
- Webhooks are inactive after creation. To activate, set active: true via PUT, or use the UI toggle, to start receiving events.
- You can register up to 20 webhooks per account. Names must be unique within your account.
- CRUD actions on webhooks are written to Audit Logs.
Authentication
Neat Pulse supports multiple authentication methods so that a customer can match their internal security posture and integration preferences.
The following methods are supported:
- None (default)
- Used for testing or closed beta environments, or in environments where authentication is not required.
- Bearer Token
- The customer provides a long, random token. Pulse includes it in the Authorization header as
Authorization: Bearer <token> - Tokens are encrypted in KeyVault, never displayed again after creation, and must be rotated by the customer.
- Use for controlled endpoints with rotating credentials.
- The customer provides a long, random token. Pulse includes it in the Authorization header as
- Basic Authentication
- The customer provides a username and password pair.
- These will be Base64 encoded and passed as
Authorization: Basic <base64(user:password)> - Used for modern API gateways or systems using token-based verification.
- Custom Header
- The customer provides a custom header where the value can contain both a token and other parameters. Pulse includes it in the Authorization header as
Authorization: <custom_header> - Use when other Authorization headers are required, for example,
Authorization: Splunk <splunk_token> - Customer headers are stored and otherwise treated like a Bearer Token.
- The customer provides a custom header where the value can contain both a token and other parameters. Pulse includes it in the Authorization header as
Credential storage
Customers configure authentication per webhook endpoint via the Pulse UI or API. Before being stored, all usernames and shared secrets are obfuscated using industry standard encryption.
These encrypted values are then managed within Azure Key Vault, which provides multi-layer, FIPS-compliant key protection through a hierarchy of encryption methods.
Credentials are encrypted at rest and are never visible after creation.
Message signing
To ensure recipients can verify that webhook messages were genuinely sent by Neat Pulse and not altered in transit, HMAC-based message signing is available.
Algorithm
Pulse uses HMAC-SHA256 with a customer-provided secret key. For every webhook event, Pulse:
- Concatenates the event body and timestamp (UNIX epoch).
- Computes a hex encoded HMAC digest using the shared secret.
- Includes the signature in the
X-Neat-Signatureheader.
Computation
base = "<raw_body>.<timestamp>"))
signature = hex(hmac_sha256(secret, base
Header
X-Neat-Signature: v1=<signature>
Verification
Recipients can verify authenticity by recomputing the HMAC on their side and comparing it with the received header value.
We recommend that recipients should reject messages older than 5 minutes based on X-Neat-Timestamp (UNIX epoch, UTC) to mitigate replay attacks.
This process prevents tampering and validates both origin (that the message came from Pulse) and integrity (that the message wasn’t altered).
Error handling and retries
If your endpoint returns non-2xx or times out, the delivery is considered failed and no automatic retry is guaranteed. Retry logic will be put into place in the future.
Managing webhooks using the Pulse UI
Webhooks can be created and managed from the Pulse UI (pulse.neat.no).
To learn how to set up a webhook for Slack, see the article: How to Set Up Webhooks for Slack.
To learn how to set up a webhook for Microsoft Teams, see this article: How to Set Up Webhooks for Microsoft Teams.
Step-by-step guide
To create a new webhook:
- Go to Settings → Alerts and Events.
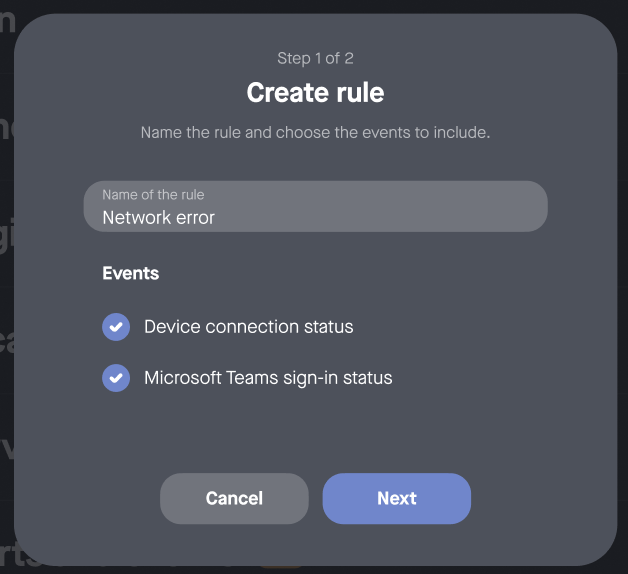
- Click Create rule. Give your rule a name and choose which events you want to subscribe to (see Figure 1).
- Click Next.
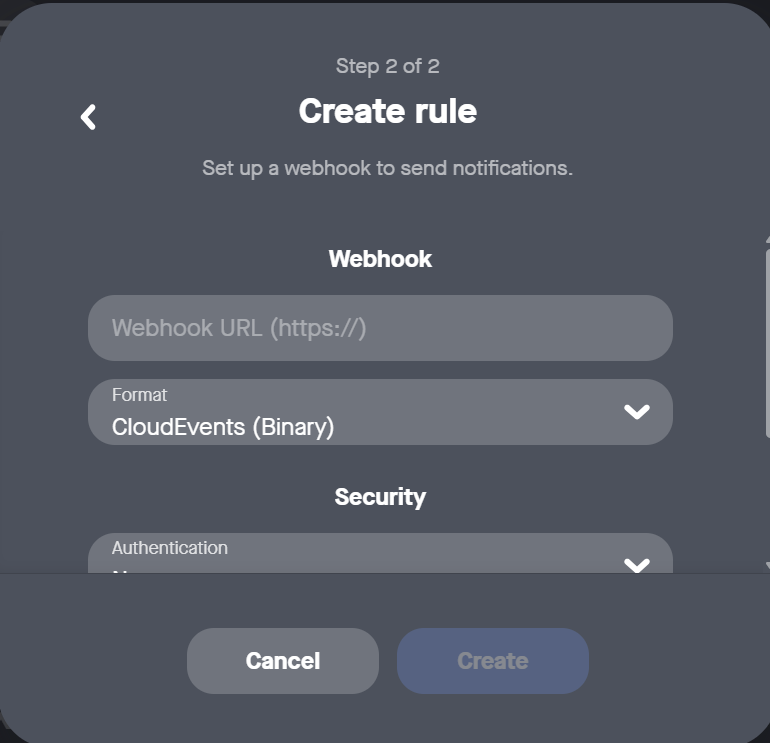
- To set up the webhook to send notifications, paste your webhook endpoint (ensure that it confirms to the requirements above), see Figure 2. Select the format from the drop-down options:
- Binary CloudEvents (default) – the message is defined using headers. The payload only contains information about the event itself.
- Structured CloudEvents – the message is defined in the payload. Only a few basic headers are set.
- Adaptive Cards and BlockKit – these formats are both messaging rendering formats for creating rich, interactive messages in Microsoft Teams apps and Slack respectively. Use these if you intend to send webhook message to these applications.
For more info on creating webhooks for these apps see How to Set Up Webhooks for Microsoft Teams and How to Set Up Webhooks for Slack.
- Scroll the side bar to select the Security options, see Figure 3. Select your method of authentication from the drop-down and the Signing secret (optional); for more info on these fields, see the Authentication and Signing section above.
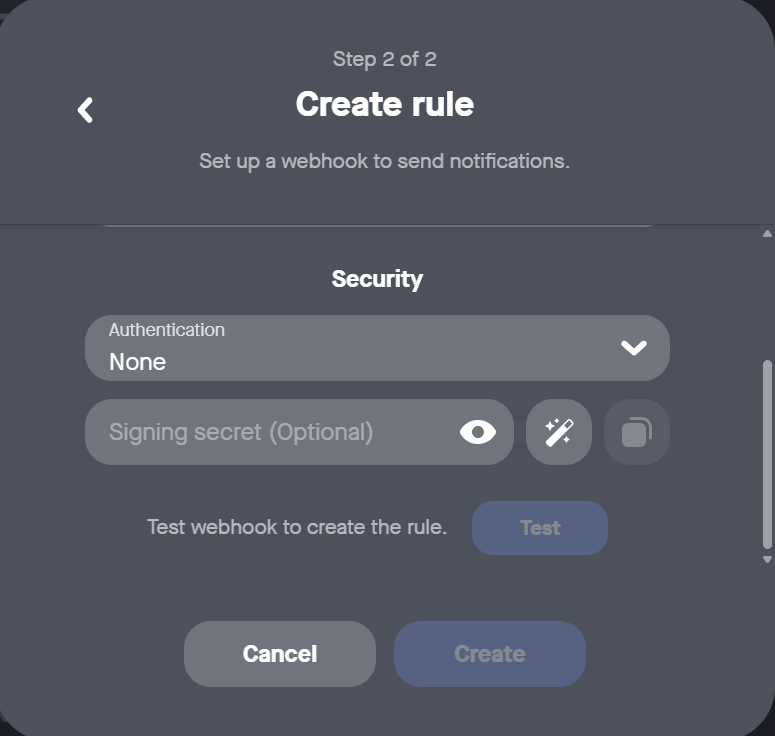
- Click Test. If the test is successful, click Create.
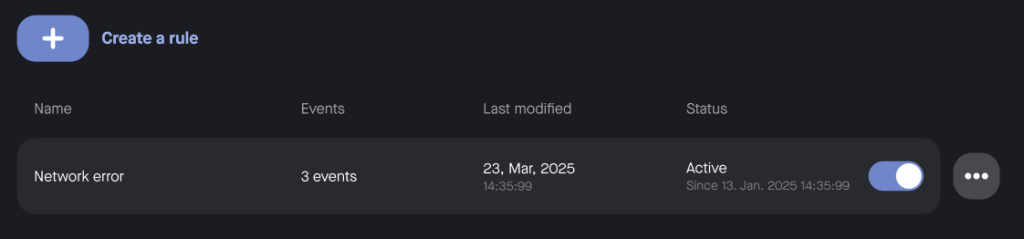
- New webhooks will be inactive by default. Click the toggle to activate the webhook and start receiving events (see Figure 4).
You will see the newly created rule and any associated events listed under Settings → Alerts and Events, from where you can also change the status and reconfigure.