How to Set Up Neat Bar Pro
Last updated on January 22, 2026
Neat Bar Pro packs a stack of tech into a simple and elegant slimline device. Capable of driving three large screens, it enables you to see people and content together more clearly. Simultaneously, its uncompromising audio and video quality give you an incredibly immersive, natural meeting experience throughout any space.
In this article, you will find simple step-by-step instructions on how to set up your Neat Bar Pro and Neat Pad (brand new or after a factory-reset).
Contents
- 1. Prerequisites
- 2. What’s Included
- Setting up your Neat Bar Pro with a Pad
- 3.1 Power up your Neat Pad
- 3.2 Power up your Neat Bar Pro
- 3.3 Choose your setup scenario
- 3.4 Choose your mounting configuration
- 3.5 Connect Neat Pad and Neat Bar Pro to the Internet
- 3.6 Select time zone and clock
- 3.7 Choose your Neat Bar Pro
- 3.8 Enroll your device on Neat Pulse (optional)
- 3.9 Share device analytics with Neat
- 3.10 Adjust your camera
- 3.11 Choose your Platform
1. Prerequisites
- The Neat Bar Pro and Neat Pad must be on the same subnet to be able to pair successfully and complete setup. Before proceeding, please read the article Network and Firewall requirements for Neat devices.
- We strongly recommend using Wired or Ethernet connection to setup the Neat Bar Pro. For the latest release notes, features, bug-fixes and limitations, please review the release notes section.
2. What’s Included
Your package comes with two boxes, one which contains Neat Pad, and another that contains Neat Bar Pro.
2.1 Neat Pad
- Open the smaller box for the Neat Pad first.
- Inside the box itself, you’ll find the Neat Pad itself, a Quick start guide, a Power-Over-Ethernet injector, Ethernet cables, and several international plugs that you can choose from depending on where you are in the world. You will also have a mount adapter, side mount and wall mount. Note: You will only need to use the side or wall-mounting hardware if you plan to use your Neat Pad as a scheduling display.
2.2 Neat Bar Pro
- Open the larger box that houses your Neat Bar Pro.
- Inside the box, you’ll find your Neat Bar Pro, a Quick Start Guide and the mounting hardware (mount adapter, wall mount, screen mount and table stand). In addition, the box includes HDMI cable, Ethernet cable and power cable for your region.
Setting up your Neat Bar Pro with a Pad
3.1 Power up your Neat Pad
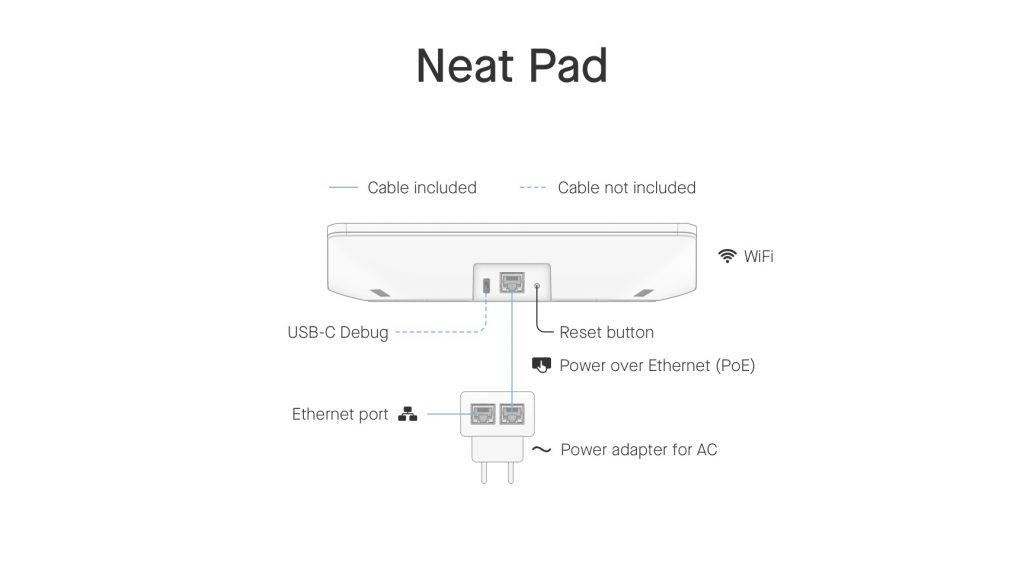
- If you have Power-Over-Ethernet (PoE) built into your network device, simply use the Ethernet cable (supplied) to plug your Neat Pad directly into an Ethernet port to receive network and power. For more information on PoE, please see the article: Neat Pad: Power over Ethernet (PoE) requirements.
OR
- If you don’t have PoE, then you can use the PoE injector (supplied) to power your Neat Pad. There are two interfaces on the PoE injector: a Power interface, to power the Neat Pad (icon shows a Pad with a finger); and a LAN interface, to connect the Neat Pad to your wired network (icon shows wired LAN). See the image below.
- To power the Neat Pad, use an Ethernet cable to connect the Pad to the PoE injector’s Power interface. Then plug the PoE injector to your power outlet/plug socket.
- Next, if you want to connect your Neat Pad to wired Ethernet, connect the PoE injector’s LAN interface to your network port using an Ethernet cable.

a)Power interface (right)
b) LAN interface (left)
3.2 Power up your Neat Bar Pro
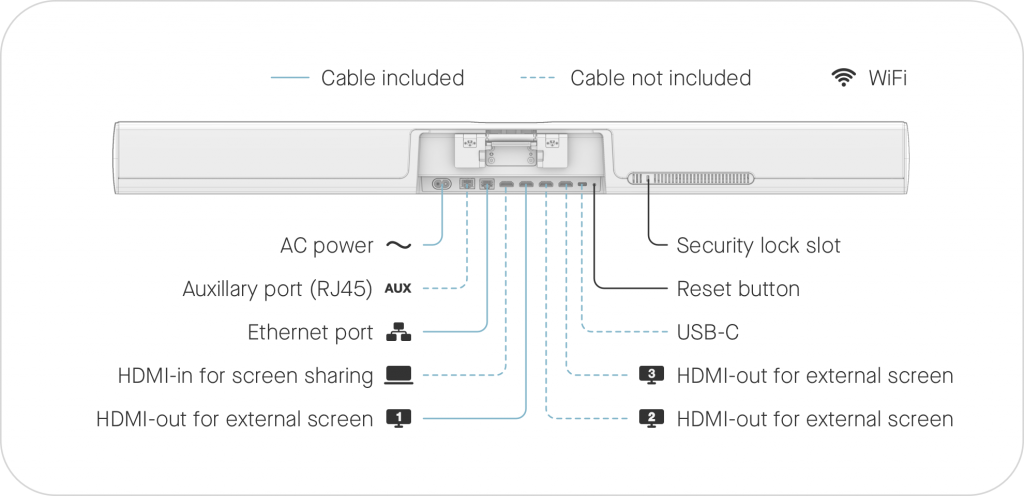
- Connect the Neat Bar Pro to AC power and to the screen using the HDMI output.
Note: If you are using a single screen, make sure you connect to Neat Bar Pro’s HDMI 1 output. If you are adding a second or third screen, please use the HDMI 2 and HDMI 3 output of the Bar Pro respectively. - Connect the Neat Bar Pro to your network switch using an Ethernet cable.
- Once this is done, follow your Neat Pad’s instructions and set the language and click Continue.
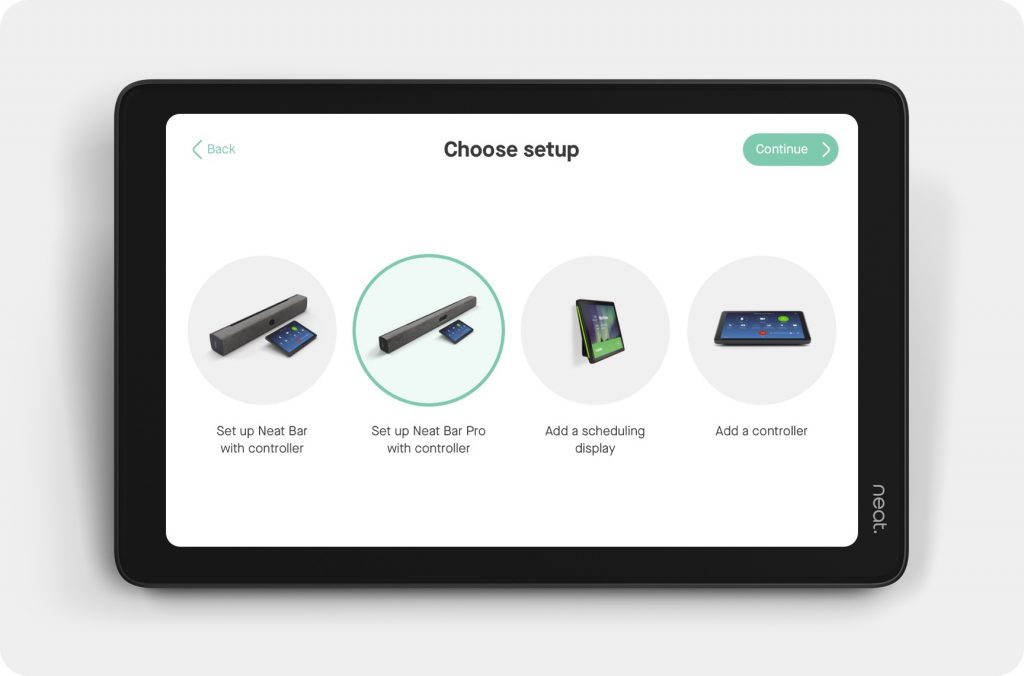
3.3 Choose your setup scenario
You will have four set-up options available to you. If you are setting up a Neat Bar Pro, the Neat Pad needs to be paired with the Bar Pro. To do so, choose “Set up Neat Bar Pro with controller.”
If you are using the Neat Pad as a standalone device (e.g. controller for a 3rd party Zoom Room or a scheduling display), choose the other two options as desired.
3.4 Choose your mounting configuration
You can choose between Table, Wall, or Screen mounting. The set-up wizard will walk you through the appropriate steps to set-up the Neat Bar Pro depending on your choice.

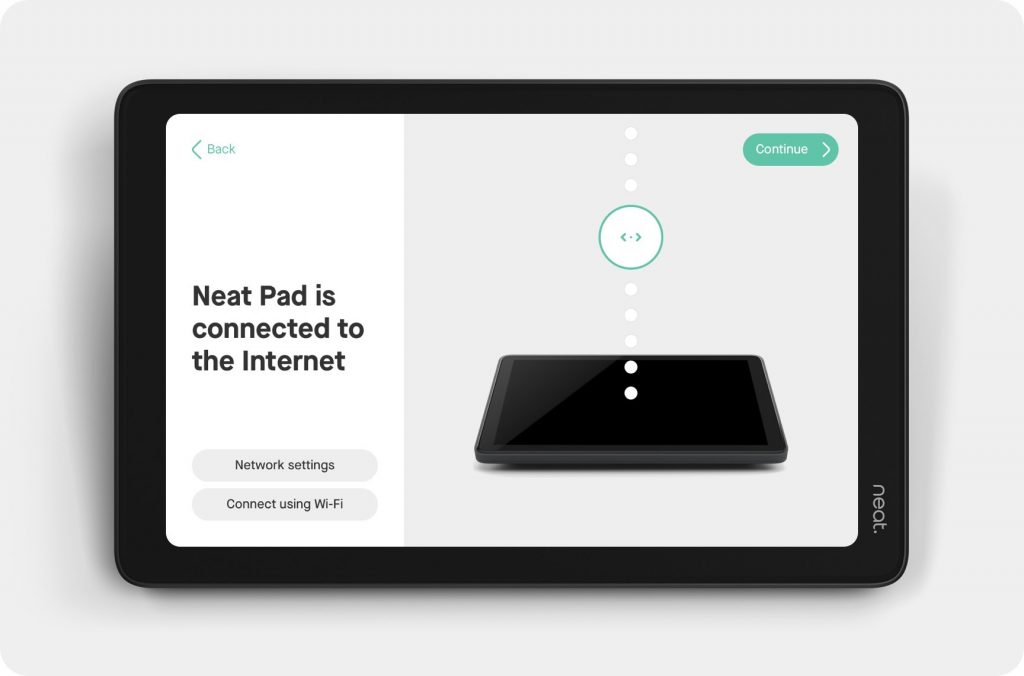
3.5 Connect Neat Pad and Neat Bar Pro to the Internet
If you’ve connected Neat Pad and Neat Bar Pro using Ethernet cables to a wired network, you should be connected to the internet automatically. Otherwise, you will need to connect Neat Pad to WiFi.
If you are using Wi-Fi, please follow the instructions in How to connect Neat Bar, Bar 2 and Bar Pro with a Neat Pad using Wi-Fi.
3.6 Select time zone and clock
Once the network connection is established, click Continue to select a time zone to use on your device and click Continue. You then have the option to select a 24-hour clock on the Time page. Click Continue.
3.7 Choose your Neat Bar Pro
Your Neat Bar Pro should be powered up and connected to a display using its HDMI 1 port. You should now see the Neat Bar Pro’s serial number on the display screen (if you do not see this, it is possible your TV screen is not set to the correct input).
- The Neat Bar Pro serial number should now appear on Neat Pad (you may see multiple serial numbers if you have multiple Neat Bars or Bar-Pros in your office).
- Select the correct serial number and click Continue.
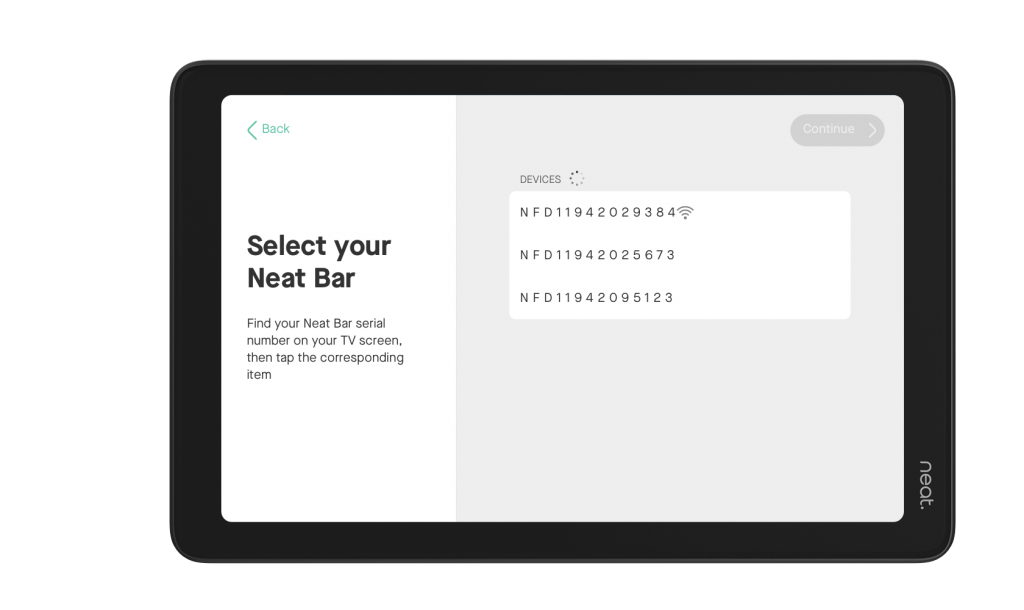
- The Neat Bar Pro and Neat Pad should now pair successfully. Once Neat Bar Pro and Neat Pad have paired, you will see a green check mark appear on Neat Bar Pro’s display, and hear a chime.
- Neat Bar Pro and Pad will now download any software updates available. Do not unplug Neat Bar Pro or Neat Pad while they update.
3.8 Enroll your device on Neat Pulse (optional)
The next screen gives you the option to enroll your devices on Neat Pulse. If you don’t wish to enroll your devices at this point, click Skip. Otherwise follow these steps.
Important Note: You can only use your device to access apps on Neat App Hub or use Google Meet* after you have enrolled your device on Neat Pulse.
*This is an initial requirement at GA.
- Go to https://pulse.neat.no/ and login.
- If you already have a named space created in Pulse that you wish to add your Neat device to, simply open that space and click Generate Code.
If you want to create a new named space in Neat Pulse or find out more information on enrolling devices to Pulse, see the article How to Enroll a Device in Neat Pulse. - Enter the generated code on the Neat Pad screen.
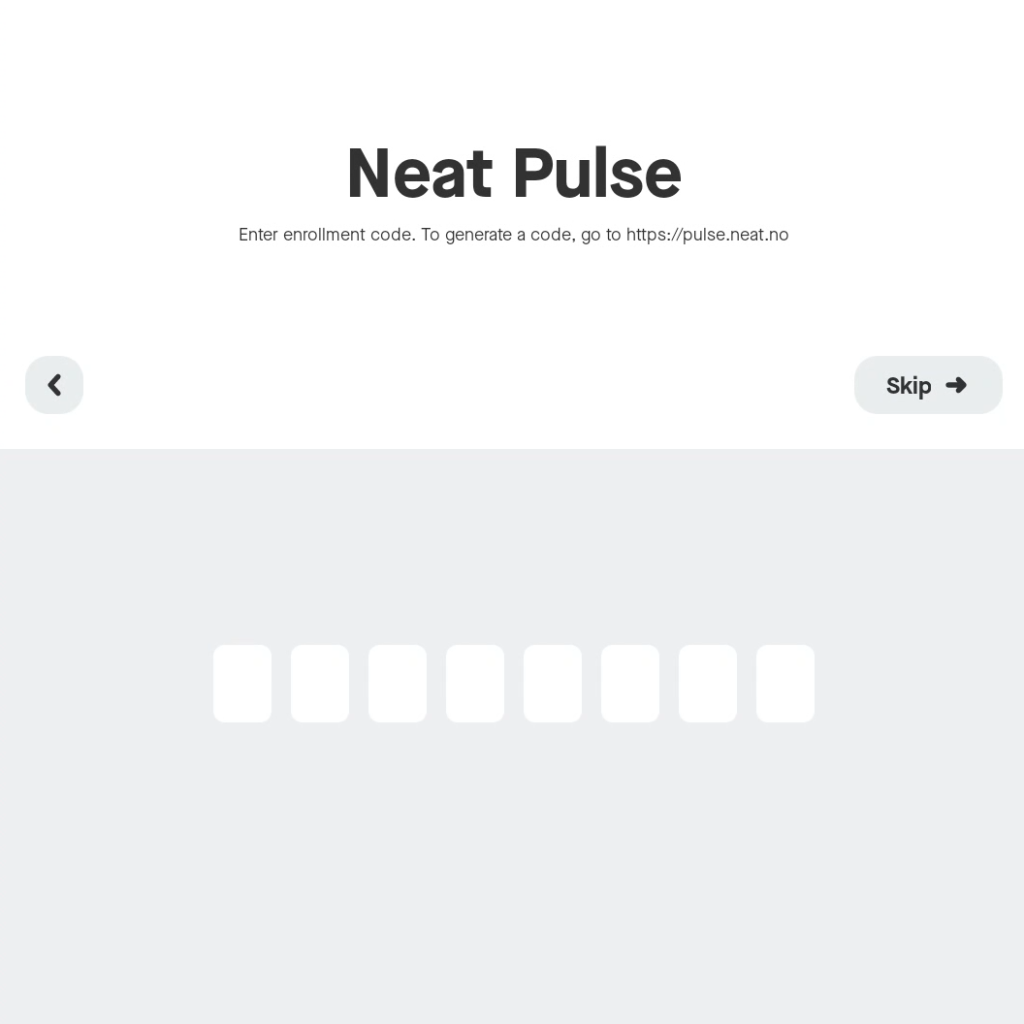
- The screen will show a progress bar to confirm that it is enrolling the devices on Neat Pulse. Do not unplug your devices during this process.
- Once completed, the Pad screen will show that the devices have been added to Neat Pulse.
- If you view Neat Pulse you will now see your newly added device in the designated named space.
- Click Continue.
Note: If you skipped this step and wish to enroll your devices on Neat Pulse at a later date, simply go to Settings > General > System settings > Add to Neat Pulse on your device interface and follow the steps above.
3.9 Share device analytics with Neat
The next page is for Analytics and Improvements. You have the option to enable or disable sharing device analytics with Neat using the toggle button. Click Continue.
3.10 Adjust your camera
Next, you’ll be prompted on the Neat Pad to adjust your Neat Bar Pro to optimize your audio and video experience.
3.11 Choose your Platform
You will now be asked to choose your platform. Once you have selected your preference click Continue to begin installing your preferred platform.
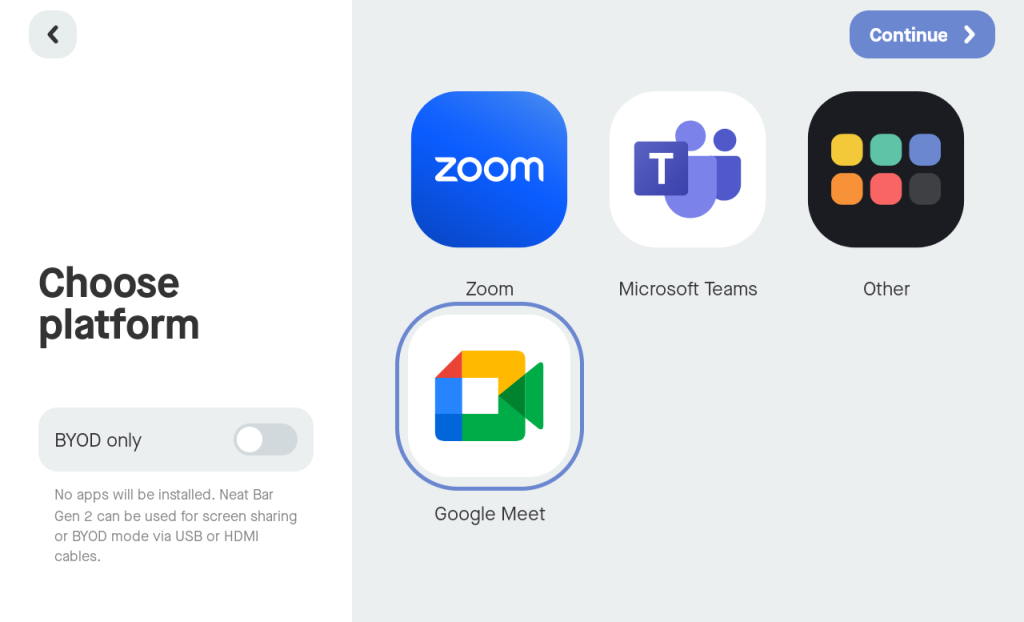
The platform will install. Do not unplug your devices whilst it is installing. Once completed, a prompt displays to confirm that your device is now ready to use and You’re all set! Click Launch.
Once you have launched your preferred platform, you can sign in to your accounts:
- Zoom: Activate your Zoom Room either by entering the device activation key here, signing in with your Zoom account directly on the Pad and selecting the correct Zoom Room, or using the Activation Code found in the Zoom Device Manager.
For more information on Zoom level pairing see Understanding Neat and Zoom Pairing on Neat devices - Teams: Activate your Microsoft Teams Room by registering both the Neat Bar and Neat Pad to your account here.
For more information on Microsoft Teams level pairing see Understanding Neat and Microsoft Pairing on Neat devices - Google Meet: You are now ready to pair and sign in on Google Meet. For more information, see How to Pair and Sign in on Google Meet.
That’s it! You are now ready to make calls using your new Neat Bar Pro and Neat Pad!